Thoracentesis — Indications, Overview, and Complications
Complete guide to ultrasound-guided thoracentesis: indications, contraindications, safe triangle anatomy, pre-procedure checklist, complications, and pleural fluid analysis.
Key points
Two indications: diagnostic (new unilateral effusion, suspected empyema) and therapeutic (symptomatic large effusion causing dyspnea)
SIR Category 1 — routine coagulation correction not required; anticoagulation does not need to be held for most patients
Always access above the rib — the intercostal neurovascular bundle (VAN) runs along the inferior rib margin; use color Doppler to rule out aberrant intercostal arteries
Limit drainage to 1–1.5 L — larger volumes risk reexpansion pulmonary edema (REPE); stop immediately if patient develops cough or chest tightness
Post-procedure: lung sliding on bedside ultrasound effectively rules out pneumothorax — routine CXR not required for uncomplicated thoracentesis
Light's criteria: exudate if fluid:serum protein >0.5 OR fluid:serum LDH >0.6 OR fluid LDH >⅔ upper normal serum LDH
Indications
Type
Indication
Diagnostic
New unilateral pleural effusion of unclear etiology; suspected empyema or malignant effusion; exudate vs. transudate differentiation
Therapeutic
Symptomatic large effusion causing dyspnea or hypoxia; relief of respiratory compromise
Contraindications
Type
Contraindication
Absolute
No safe ultrasound window (no accessible effusion); patient refusal
Relative
Overlying cellulitis or skin infection at access site; severe coagulopathy (INR >3.0 or platelets <20K); single contralateral functioning lung; mechanical ventilation (increased pneumothorax risk)
Relevant Anatomy
Access Site
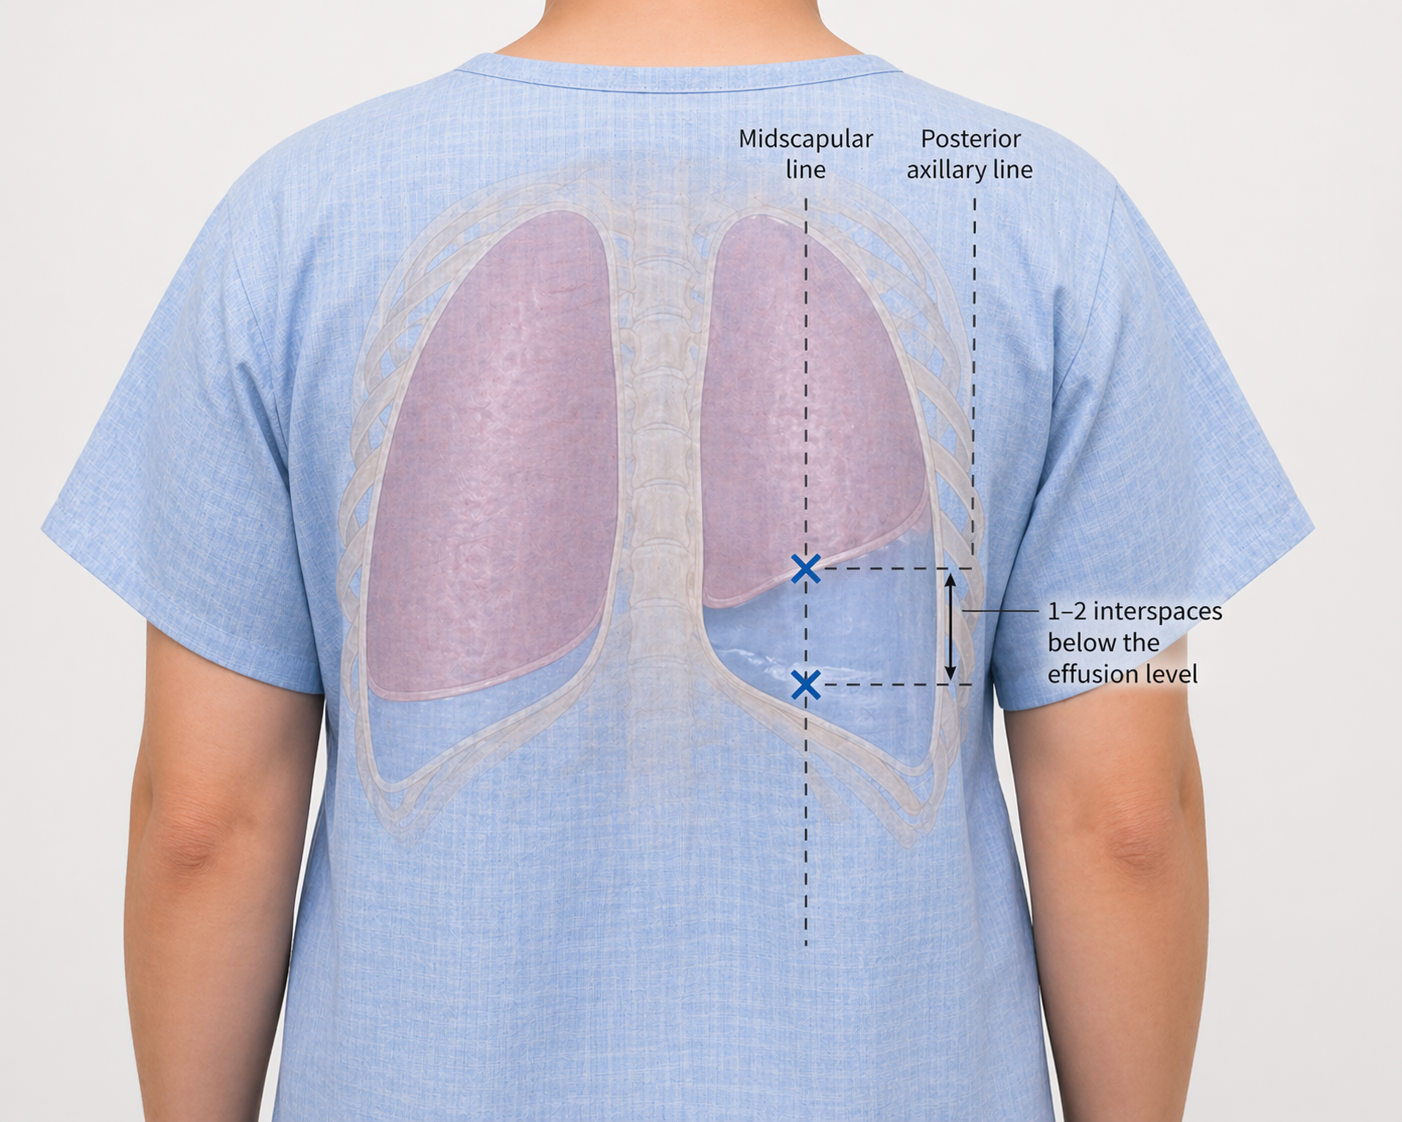
The posterior chest wall is the preferred access site, typically in the posterior axillary to midscapular line, 1–2 interspaces below the effusion level. The needle is advanced over the superior margin of the rib.
Access zone between the midscapular and posterior axillary lines, 1–2 interspaces below the effusion level (blue ×). Needle advanced above the rib to avoid the neurovascular bundle.
Danger Structures
Intercostal neurovascular bundle (VAN — Vein, Artery, Nerve): runs along the inferior rib margin. Always access above the superior rib edge. Use color Doppler to identify aberrant intercostal arteries, which may course mid-intercostal space in elderly patients.
Diaphragm: mark at end-expiration to avoid transgression; diaphragm is highest at end-expiration.
Liver (right) / Spleen (left): at risk if access is below the diaphragm.
Atelectatic lung: may float near the access site; visualize real-time lung movement on ultrasound.
Pre-Procedure Checklist
Imaging Review
Review prior CXR or CT to estimate effusion volume, assess for loculations, and evaluate the contralateral lung
Identify any prior thoracic surgery or pleural disease that may affect access
Labs
SIR Category 1: INR <3.0, platelets >20,000. Routine correction of coagulopathy is not required. Anticoagulation does not need to be held for most patients.
Patient Positioning
Preferred: seated upright leaning forward over a bedside table — opens posterior intercostal spaces for optimal access
Alternatives: lateral decubitus (affected side up) for patients who cannot sit; semi-recumbent for mechanically ventilated patients
Consent Discussion Points
Pneumothorax: 2–6% (US-guided ~3%); majority is pneumothorax ex vacuo (self-limited)
Bleeding/hemothorax: <1%
Reexpansion pulmonary edema (REPE): rare but potentially fatal
Organ injury (liver right, spleen left)
Infection (rare with sterile technique)
Fluid Analysis Planning
Specify laboratory orders in advance: Light's criteria panel (protein, LDH — both fluid and serum), pH, glucose, cell count with differential, Gram stain and culture. Add cytology if malignancy is suspected; triglycerides if chylothorax is a concern.
Equipment Overview
Ultrasound with sterile probe cover and gel
Thoracentesis needle-catheter kit
Local anesthetic
Sterile prep supplies and drape
Syringes and specimen collection tubes
Vacuum drainage bottles and connecting tubing (therapeutic cases)
Procedure Overview
Ultrasound survey: confirm effusion, measure depth, identify diaphragm and adjacent structures, mark access site above rib
Position patient and apply sterile prep and drape
Infiltrate local anesthetic from skin to parietal pleura; confirm anesthesia at the rib periosteum
Advance access needle above the rib under real-time ultrasound guidance
Collect diagnostic specimens into appropriate tubes
For therapeutic drainage: connect to vacuum bottles, monitor volume closely, limit to 1–1.5 L; stop if cough or chest tightness develops
Remove at end-expiration; apply occlusive dressing
Complications
Complication
Rate
Recognition & Management
Pneumothorax
2–6% (US-guided ~3%)
Most common complication. Majority is pneumothorax ex vacuo from non-expandable lung — self-limited, does not require tube placement. Check for lung sliding on bedside US. Obtain CXR only if symptomatic. Chest tube for >25% PTX or persistent symptoms.
Hemothorax
<1%
Intercostal vessel injury. Recognized as increasing pleural opacity on CXR; hyperdense on CT. Persistent bleeding may require embolization of the intercostal artery via IR.
Reexpansion pulmonary edema (REPE)
<1% but potentially fatal
Presents with cough, dyspnea, and frothy sputum within hours of drainage. Unilateral pulmonary edema on CXR. Prevent by limiting drainage to 1–1.5 L. Management: supplemental O₂, supportive care.
Organ injury
Rare
Liver (right side) or spleen (left side) if access is below the diaphragm. Prevented by ultrasound guidance and diaphragm marking at end-expiration.
Infection
Rare
Rare with proper sterile technique. Monitor for fever and worsening symptoms post-procedure.
Post-Procedure Care
Vital signs and oxygen saturation monitoring for 1–2 hours
Bedside ultrasound to assess for lung sliding — effectively rules out clinically significant pneumothorax
Routine post-procedure CXR is not required for uncomplicated ultrasound-guided thoracentesis; obtain if patient is symptomatic
Document fluid color, clarity, and volume drained
Monitor for REPE signs (cough, dyspnea, desaturation) for up to 24–72 hours
Pleural Fluid Analysis Reference
Light's Criteria — Exudate if Any One Met
Pleural fluid protein / serum protein >0.5
Pleural fluid LDH / serum LDH >0.6
Pleural fluid LDH > ⅔ upper limit of normal serum LDH
<7.20 suggests complicated parapneumonic or empyema
pH <7.20 is indication for drainage
Protein (fluid)
<3 g/dL
>3 g/dL
Use ratio with serum for Light's
LDH (fluid)
<200 IU/L
>200 IU/L
Use ratio with serum for Light's
Glucose
Normal (serum level)
Low (<60 mg/dL) in empyema, RA, malignancy
Amylase
Normal
Elevated in pancreatitis, esophageal rupture
Triglycerides
Normal
>110 mg/dL = chylothorax
Order if milky appearance
Hematocrit (fluid)
<1%
>50% serum Hct = hemothorax
Cytology
Negative
Positive in malignant effusion (~60% sensitivity)
Send if malignancy suspected
Gram stain / culture
Negative
Positive in empyema
Inoculate blood culture bottles at bedside for yield
When to Escalate
New dyspnea or desaturation during drainage: stop drainage immediately, check for PTX with bedside US
Pneumothorax >25% or symptomatic PTX after failed observation: chest tube placement
Hemothorax with ongoing bleeding >300–500 mL/hr: CT angiography; IR consultation for intercostal artery embolization
REPE: supplemental oxygen, supportive care; escalate to ICU if severe hypoxia
Full technique in RadCall Pro
Full step-by-step technique, equipment setup, and periprocedural management available in RadCall Pro — built for the IR suite.