Indications
| Indication | Details |
|---|---|
| Empyema | Frank pus in the pleural space; positive Gram stain or culture; requires drainage |
| Complicated parapneumonic effusion | pH <7.20, glucose <60 mg/dL, or LDH >1,000 IU/L; loculated effusion — requires drainage |
| Pneumothorax | Large (≥25% or symptomatic) primary spontaneous PTX; any secondary spontaneous PTX; tension PTX; traumatic PTX; iatrogenic PTX after failed observation |
| Hemothorax | Traumatic or spontaneous; large hemothorax or ongoing bleeding; delayed hemothorax |
| Recurrent malignant pleural effusion | When tunneled pleural catheter is not appropriate or available |
| Chylothorax | After thoracic surgery or trauma; in conjunction with dietary modification |
What Not to Treat with Chest Tube
- CHF transudative effusion (diurese first)
- Hepatic hydrothorax (TIPS or liver transplant workup)
- Pneumothorax ex vacuo from trapped lung (tube will not expand lung)
- Mediastinal emphysema without pleural component
Contraindications
| Type | Contraindication |
|---|---|
| Absolute | Lung adherent to chest wall throughout the entire hemithorax (no pleural space); diaphragmatic hernia at proposed site |
| Relative | Overlying skin infection; trapped lung |
Relevant Anatomy
VAN Rule
The intercostal neurovascular bundle — Vein, Artery, Nerve — runs in a groove along the inferior margin of each rib. To avoid these structures, always enter above the superior margin of the rib below. Exception: near the posterior paravertebral space, the posterior intercostal artery may course in the mid-intercostal space — use color Doppler to confirm before access in this region.
Tube Positioning by Pathology
- Pneumothorax: air rises anteriorly in a supine patient — target anterior apical position (second intercostal space, midclavicular line) or anterior axillary approach
- Pleural effusion / empyema: fluid collects posteriorly — target posterolateral position, mid-axillary line or posterior axillary line
Safe Triangle
The safe triangle for surgical chest tube placement is bordered by the lateral edge of pectoralis major, the anterior edge of latissimus dorsi, and a horizontal line at the nipple level (5th ICS). Image guidance with ultrasound and CT expands access options beyond this landmark.
Pre-Procedure Checklist
Imaging Review
- CT chest to assess: free-flowing vs. loculated effusion, relationship to fissures, trapped lung, solid pleural lesions
- Establish tube trajectory and target location on imaging before procedure
Labs and Classification
SIR Category 1: INR <3.0, platelets ≥20,000. Routine coagulation correction not required.
If effusion: send Light's criteria panel (protein, LDH, glucose, pH, cell count with differential, Gram stain and culture, cytology for malignant effusion).
Antibiotics for Empyema
Initiate broad-spectrum IV antibiotics covering anaerobes and S. aureus before or at the time of drainage. Tailor based on culture results.
Sedation and Consent
- Moderate IV sedation for catheter placement procedures
- Consent: malposition (~30% non-image-guided, much lower with CT/US guidance); intercostal artery injury; organ laceration (spleen/liver/diaphragm); REPE; infection; tube dislodgement
Equipment Overview
- Ultrasound with sterile probe cover and gel (primary guidance)
- Fluoroscopy for wire and catheter positioning
- Access needle, J-wire
- Serial dilators and pigtail catheter (or large-bore tube for hemothorax/empyema)
- Scalpel for skin incision
- Suture material for tube securing
- Sterile drape and prep supplies
- Three-chamber water seal drainage system
- Suction tubing
Procedure Overview
- Review CT/CXR and plan trajectory; mark access site
- Position patient: semi-recumbent or lateral decubitus depending on target and pathology
- Ultrasound survey: confirm fluid or air collection, mark diaphragm at end-expiration, use color Doppler over access site
- Sterile prep and drape; moderate IV sedation
- Needle access above rib under real-time US guidance; confirm pleural entry with fluid or air return
- Advance J-wire under fluoroscopic guidance toward target position
- Serial dilation of the tract over the wire
- Advance catheter: orient anteriorly for PTX or posterolaterally for fluid/empyema; confirm position under fluoroscopy
- Connect to three-chamber water seal drainage system
Three-Chamber Drainage System Overview
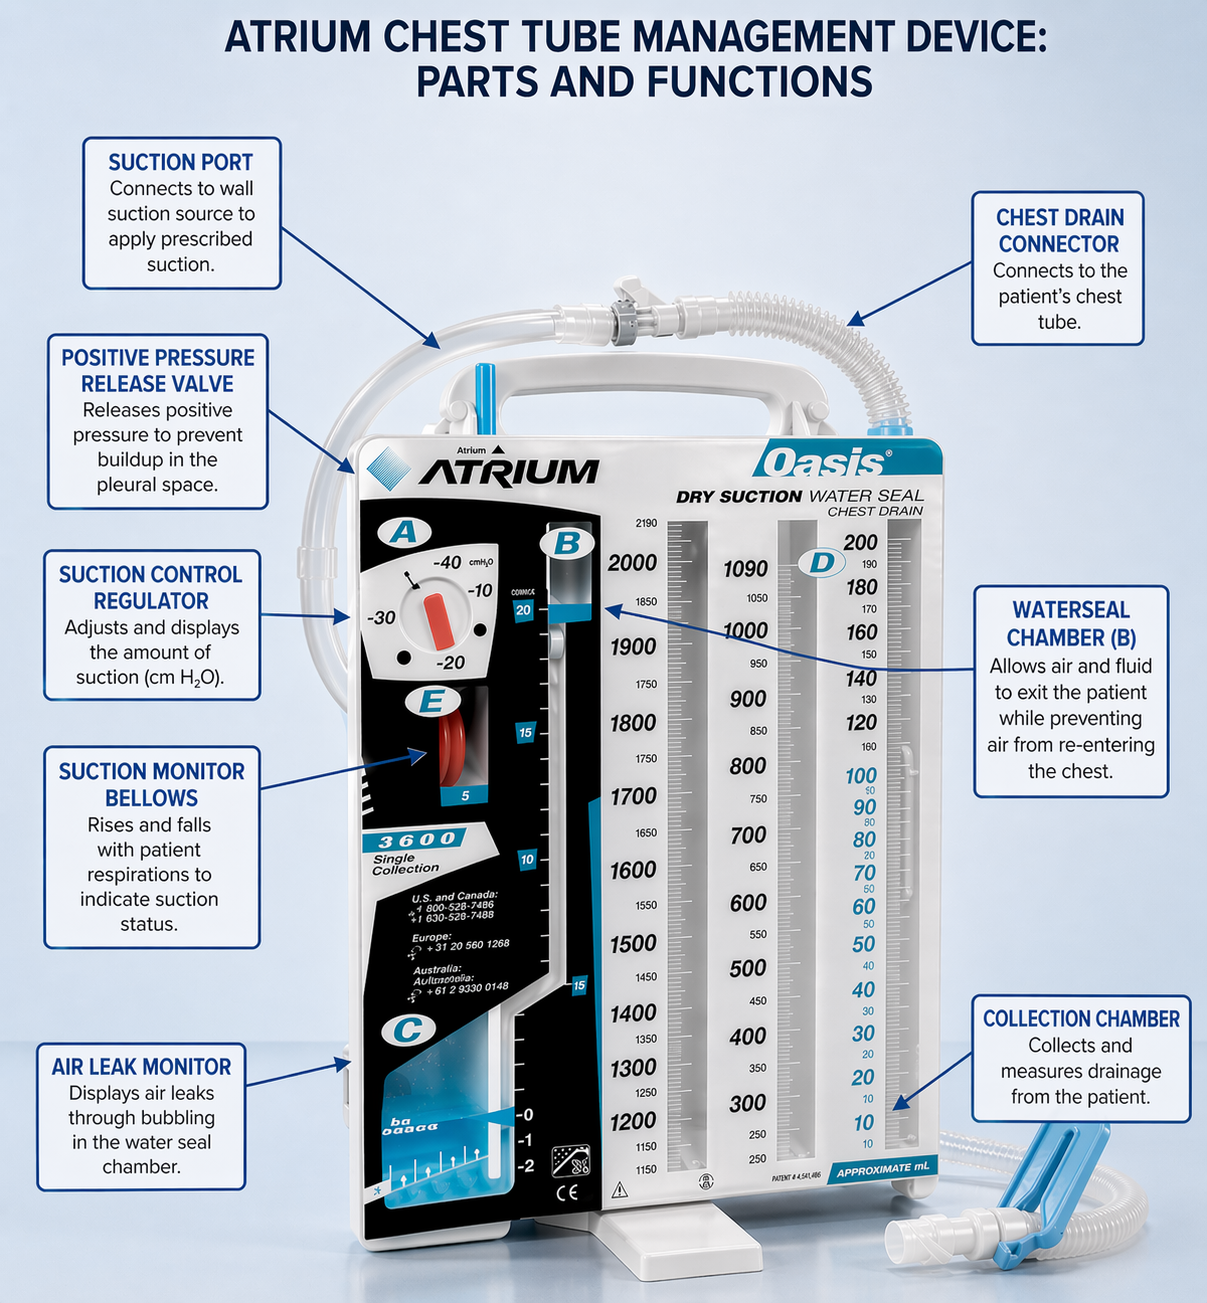
- Collection chamber: measures output volume and records appearance of drained fluid
- Water seal chamber: tidal fluctuation with respiration confirms a patent tube; active bubbling during quiet respiration confirms an air leak
- Suction control: standard setting −20 cmH₂O; confirm bubbling in suction control chamber when active suction is applied
- Heimlich valve: may be used for ambulatory patients with resolved PTX; not appropriate for empyema drainage
tPA + DNase for Loculated Empyema
MIST2 trial evidence: Intrapleural tPA + DNase combination dramatically improves drainage and reduces surgical referral in loculated empyema. Neither agent alone is effective — the combination is required.
- tPA 10 mg + DNase 5 mg per dose
- Administered intrapleurally twice daily for 3 days
- Chest tube clamped for 1 hour after each instillation to allow dwell time
Complications
| Complication | Rate | Recognition & Management |
|---|---|---|
| Malposition | Up to 30% (non-image-guided); much lower with CT/US guidance | Intrafissural, intraparenchymal, extrapleural, or mediastinal — recognized on CXR or CT. Reposition under fluoroscopic guidance. |
| Intercostal artery injury | <1% with IR guidance | Hemothorax; CT angiography to localize bleeding vessel. Transcatheter arterial embolization (TAE) as treatment. |
| Organ laceration | Rare with imaging guidance | Spleen (left), liver/diaphragm (right) if access is below the diaphragm. Prevented by marking diaphragm at end-expiration on ultrasound. |
| Reexpansion pulmonary edema (REPE) | <1% but life-threatening | Unilateral pulmonary edema on CXR after large-volume drainage. Prevent by limiting initial drainage to 1,000–1,500 mL; clamp 1–2 h before resuming. Management: supplemental O₂, supportive care, ICU if severe. |
| Empyema from tube | ~0.2% with IR guidance | Rare with sterile technique. Presents as persistent fever and new purulent output. |
| Bronchopleural fistula | Uncommon | Persistent air leak >5–7 days. Thoracic surgery consultation for operative management. |
| Tube obstruction | Variable | Reduced output with persistent collection on imaging. Flush with saline per protocol; reposition or replace under fluoroscopic guidance. |
Post-Procedure Assessment and Removal Criteria
Daily Assessment
- Output volume and appearance (serous vs. purulent vs. bloody)
- Water seal chamber: tidal fluctuation with breathing confirms tube patency
- Cough test: bubbling during cough confirms active air leak — do not remove tube
Removal Criteria — Effusion/Empyema
- Output <200 mL/day
- Drainage has become serous
- CXR confirms adequate drainage of collection; obtain CT if equivocal
- Clinically improving (afebrile, improving leukocytosis)
Removal Criteria — Pneumothorax
- No air leak for 24 hours on water seal (no bubbling)
- Water seal trial (NOT clamping trial) to confirm resolution
- CXR shows re-expanded lung
Removal Technique
Remove at end-expiration or during Valsalva maneuver. Have petrolatum gauze ready to immediately occlude the site. Apply occlusive dressing and obtain CXR within 1–4 hours post-removal.
When to Escalate
- REPE signs during drainage: stop drainage immediately, clamp tube; supplemental O₂; ICU consultation for severe cases
- Persistent air leak >5–7 days: thoracic surgery for bronchopleural fistula evaluation and management
- Hemothorax from intercostal artery injury: CT angiography; IR consultation for TAE
- Mediastinal tube position: do not attempt blind repositioning; surgical consultation before any manipulation