Indications / Contraindications
Indications
- Enlarging or persistent nodule/mass ≥1 cm — evaluate for primary or metastatic malignancy; provides tissue for molecular profiling required for targeted therapy
- Suspected infection not responding to treatment — FNA can identify microorganisms
- Non-infectious inflammatory processes (e.g., sarcoidosis, organizing pneumonia)
- Technically feasible for lesions ≥1 cm; diagnostic yield lower for nodules ≤1.5 cm
Alternatives to Consider First
- Bronchoscopy / BAL for hilar masses accessible endobronchially
- EBUS for central or hilar lesions adjacent to airways
- VATS for pleural or peripheral lesions requiring resection
- Biopsy of safer extrathoracic or mediastinal disease if present
Contraindications
- Absolute: INR ≥1.5 · Platelets ≤50,000/µL · Patient unable to cooperate or hold still
- Relative: Severe emphysema · Severe pulmonary hypertension · Oxygen dependence · Unable to hold aspirin (platelet count >100,000 preferred)
- Contralateral pneumonectomy — pneumothorax could be fatal; requires careful risk-benefit assessment
Pre-Procedure Checklist
Relevant Anatomy
Access Site Principles
- Prone positioning preferred — minimizes chest wall motion; patient recovers supine (natural position change acts as positional therapy for small pneumothorax)
- Choose skin entry at midpoint of CT slices showing the path to the target
- Prefer medial-to-lateral trajectories — less rib motion medially
- For central lesions: trajectory parallel to segmental vessels (avascular plane)
- For necrotic or cavitated lesions: target the viable wall
- Entry angle >30° to prevent sliding off the pleura
- Gantry tilt to avoid ribs when needed
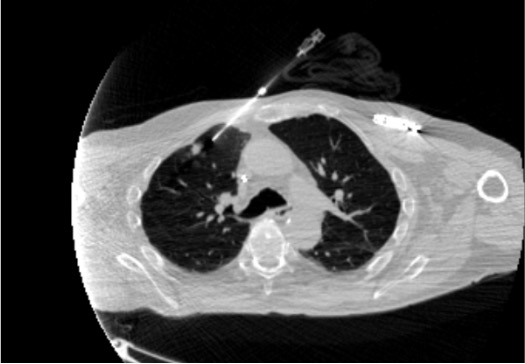
- Minimize number of pleural crossings — coaxial technique achieves this
Structures to Avoid
- Fissures — crossing a fissure significantly increases pneumothorax risk
- Bullae and emphysematous lung — high risk of air leak; plan around these on planning CT
- Vessels: Internal mammary artery (medial chest wall), intercostal vessels (inferior rib margin), subclavian artery, axillary vessels
- Segmental pulmonary arteries — use contrast CT for trajectory planning in central lesions
- Intercostal neurovascular bundle — hug the superior rib margin when crossing between ribs
Technique
Default RadCall approach · share your own below
Supplies
Steps
Patient positioning
Planning scan
Skin prep + local anesthesia
Pre-pleural position + lidocaine bolus
Pleural puncture
Targeting + needle positioning
FNA passes (if being performed — cytology/microbiology)
Core biopsy passes
Post-biopsy CT
Troubleshooting
No aspiration despite apparently correct position
Likely cause: Lesion may be fibrotic or highly cellular; tissue too solid for FNA aspiration.
Next step: Try repositioning needle tip within lesion. Use smaller gauge needle. Proceed directly to core biopsy passes.
Needle tip not visible on CT
Likely cause: Metal streak artifact from introducer obscuring tip.
Next step: Partially withdraw stylet to reduce artifact. Switch to bone window settings — metal tips often visible on bone windows when obscured on soft tissue windows.
Lesion not visible at time of procedure
Likely cause: Window/level not optimized; lesion may have partially resolved; GGO lesion collapses with sedation/positioning.
Next step: Recheck window and level settings. Compare directly to prior contrast CT at same level. Consider CEUS guidance. For GGO lesions, reduce sedation depth to restore ventilation.
Wire or needle resistance on insertion
Likely cause: Calcified or heavily fibrotic lesion; cortical bone (if rib contact).
Next step: Confirm on bone windows. For calcified lesion: may need slight trajectory adjustment. For rib contact: use gantry tilt to walk needle over rib margin.
Patient coughing during procedure
Likely cause: Pleural irritation or inadequate sedation/analgesia.
Next step: Administer additional fentanyl (cough suppression effect). Have patient modify breathing pattern. Consider brief voluntary breath-hold during critical needle passes. If needle is across pleura, minimize unnecessary movement.
Pneumothorax develops during procedure
Likely cause: Air leak at pleural crossing; emphysematous lung adjacent to tract.
Next step: If small (<2 cm from pleura) and hemodynamically stable, may continue if additional passes are essential. If enlarging or symptomatic, consider aspiration through the introducer or abort and place 8Fr chest tube in IR suite.
Difficulty reaching deep or central lesion
Likely cause: Introducer too short; suboptimal gantry angulation.
Next step: Reposition patient to shorten skin-to-target distance. Use longer introducer needle (spec: 5 cm longer than skin-to-target distance). Ensure correct gantry angulation is applied.
Complications
Major
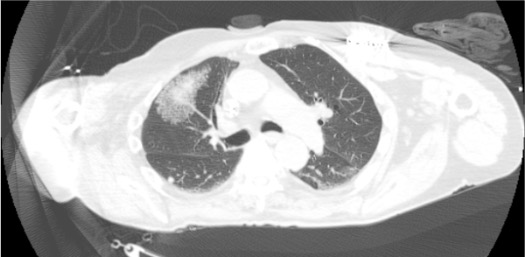
- Pneumothorax (~30% overall; ~5% require chest tube) — risk factors: emphysema, small lesion, deep lesion, multiple passes, crossing fissures. Small/stable → observation + supplemental O₂. Enlarging or symptomatic → 8Fr chest tube, placeable in IR suite.
- Hemoptysis — minor in 3–5%; significant (<1%). Usually self-limited. Position patient biopsy-side-down to protect contralateral lung. Supplemental O₂. Bronchoscopy available for massive hemoptysis.
- Air embolism — rare but catastrophic. Risk with open needle hub. Immediate management: left lateral decubitus + Trendelenburg position; hyperbaric O₂.
Minor / Delayed
- Hemothorax (<1%) — may require thoracentesis or chest tube if significant
- Pulmonary hemorrhage — common on post-procedure CT; usually self-limited; monitor for hemoptysis
- Infection / empyema (<1%) — prophylactic antibiotics not routine; standard sterile technique
- Tumor seeding — extremely rare with coaxial technique; needle tract seeding well-documented only for certain histologies (hepatocellular, pleural mesothelioma)
- Vasovagal reaction — from pain at pleural puncture; prevention with adequate fentanyl pre-puncture
Post-Procedure Care
Monitoring + Imaging
- 2-hour post-procedure CXR — if no pneumothorax and patient asymptomatic, may discharge
- Vitals q30 min for 2 hours
- Pain assessment — pleuritic chest pain may indicate pneumothorax or hemorrhage
- Oxygen saturation monitoring throughout observation period
Pneumothorax Management + Discharge
- If pneumothorax identified on post-procedure CT: assess size. Small and stable → additional CXR in 2–4h
- If enlarging or symptomatic → aspiration with 14G angiocath, or small-bore chest tube
- Discharge instructions: no strenuous activity × 24h; return to ED for increasing chest pain, shortness of breath, or hemoptysis
- For emphysematous patients: 2-hour observation minimum; low threshold for extended observation even without immediate post-procedure pneumothorax
Critical Pearls
Specimen Handling
| Specimen Type | Container | Purpose |
|---|---|---|
| FNA (cytology) | Slide (immediate smear) or saline/RPMI | Cytology, cell block, flow cytometry, molecular testing |
| Core biopsy (histology) | 10% formalin | H&E histology, IHC, molecular profiling (EGFR, ALK, PD-L1, etc.) |
| Core biopsy (fresh) | Saline or RPMI (no formalin) | Flow cytometry (if lymphoma suspected), culture, biobanking |
| Suspected infection | Sterile saline or culture media — no formalin | Bacterial, fungal, mycobacterial culture |
| Cell block | CytoLyt or saline-rinsed syringe | Molecular profiling, IHC on cell block sections |
Key Handling Rules
- Call pathology in advance — confirm container requirements and whether on-site cytopathologist (ROSE) is available for adequacy check
- Minimum 2–3 cores per target for adequate histology plus molecular profiling
- Label every container immediately at the table: patient name, MRN, date, site, pass number
- Never place infection specimens in formalin — kills organisms and prevents culture
- FNA slides should be sprayed with fixative or air-dried immediately depending on staining protocol — confirm with cytopathology
- For suspected lymphoma: fresh core in RPMI for flow cytometry; formalin for IHC; coordinate with hematopathology
References & Resources
Key Guidelines
- ACR–SIR Practice Parameter for Percutaneous Transthoracic Lung Biopsy
- ACCP Evidence-Based Clinical Practice Guidelines: Invasive Staging of Lung Cancer
Primary References
- Gupta S, Ahrar K, Morello FA Jr, Wallace MJ, Hicks ME. Masses in or adjacent to the mediastinum: treatment with US-guided percutaneous injection of absolute ethanol. Radiology. 2001;221(3):786–790.
- Manhire A, Charig M, Clelland C, et al; BTS. Guidelines for radiologically guided lung biopsy. Thorax. 2003;58(11):920–936.
- Yeow KM, Su IH, Pan KT, et al. Risk factors of pneumothorax and bleeding: multivariate analysis of 660 CT-guided coaxial cutting needle lung biopsies. Chest. 2004;126(3):748–754.