Indications & Patient Selection
Indications
- Vertebrogenic chronic low back pain due to Modic type I or II endplate changes on lumbar MRI
- Chronic LBP ≥6 months duration with VAS ≥4
- Modic changes at L3–S1 confirmed on MRI ≤6 months old
- Failed conservative therapy: physical therapy, NSAIDs, and spinal injections (facet, SI joint, epidural)
- Typical levels treated: L3-4, L4-5, L5-S1; 1–3 levels most common
- Also effective for adjacent-level vertebrogenic pain after prior lumbar fusion
Contraindications
- Modic III changes only (sclerotic end plates — no inflammatory component, no pain response expected)
- Osteoporosis (T-score < −2.5 at treatment level) — increased fracture risk through ablation zone
- Active spinal infection
- Uncorrectable coagulopathy
- Prior spinal fusion at the target level
- Primary pain source identified as discogenic, facetogenic, or SI joint (must rule out before proceeding)
Modic Change Classification (MRI Criteria)
| Type | T1 Signal | T2 Signal | Pathology | Pain Response |
|---|---|---|---|---|
| Type I | Hypointense (dark) | Hyperintense (bright) | Active inflammation / subchondral edema | Responds; may respond slightly better |
| Type II | Hyperintense (bright) | Isointense | Fatty marrow conversion | Responds; acceptable indication per labeling |
| Type III | Hypointense | Hypointense | Sclerotic / end-stage degeneration | No response; contraindication |
Required Workup
- MRI lumbar spine ≤6 months old confirming Modic I or II at target level(s) — review T1 and T2 sequences carefully
- Baseline VAS and Oswestry Disability Index (ODI) scores documented
- X-ray or DEXA to assess bone quality; exclude osteoporosis at treatment level
- Clinical exam excluding radiculopathy as primary complaint
Pre-Procedure Checklist
Relevant Anatomy
Basivertebral Nerve (BVN)
- Sensory nerve located within the posterior vertebral body; transmits pain signals from the vertebral endplates
- Enters the vertebral body through the basivertebral foramen (BVF) — a midline posterior channel that also carries the basivertebral veins
- Innervates the superior and inferior endplates of the vertebral body
- Nerve density increases in damaged and degenerated endplates — sensitization underlies vertebrogenic pain in Modic I/II changes
- Target for ablation: posterior one-third of the vertebral body, centered on the BVF
Basivertebral Foramen & Access Route
- BVF location: midline, posterior vertebral body at mid-height of the vertebra — visible as a notch or indentation on lateral fluoroscopy
- Transpedicular approach: the trocar enters through the pedicle (ipsilateral) to reach the posterior vertebral body center — pedicle acts as a bony "tunnel" protecting neural structures
- Bilateral pedicle access (right and left) provides better BVF coverage; curved cannula deflects to midline from each side
- Ablation zone at 85°C × 15 minutes creates an ovoid zone encompassing the BVF and surrounding subchondral bone
- Post-ablation MRI: oval signal change within the vertebral body (STIR/T1/T2) confirms ablation zone
Technique
Default RadCall approach · share your own below
Supplies
Steps
Positioning & planning
AP "Owl Eye" targeting
Transpedicular trocar advancement
Insert curved working cannula
Confirm BVF position
Insert Intracept RF probe & ablate
Contralateral pedicle (bilateral approach)
Repeat at additional levels
Post-procedure confirmation & closure
Fluoroscopic Landmarks
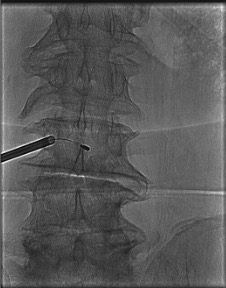
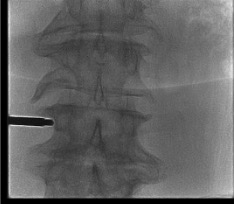
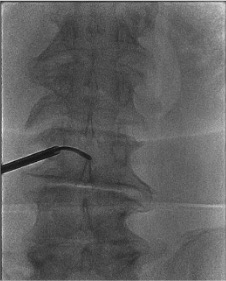
AP View — "Owl Eye" Pedicle Targeting
- Both pedicles appear as oval or circular targets ("owl eyes") in AP view when the endplate is squared with the fluoroscopy beam
- Advance trocar coaxially within the ipsilateral pedicle oval — tip should remain inside the pedicle circle throughout advancement
- Trocar medial wall breach (tip crosses the medial pedicle cortex) → risk of epidural hematoma; stop and recheck
- Final curved cannula tip: at or crossing midline on AP = correct BVF position
- Tip lateral to midline on AP = has not reached BVF; curved cannula entry point too lateral
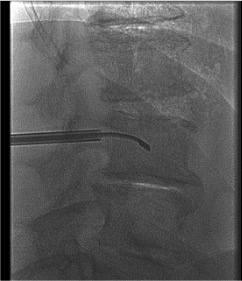
Lateral View — Depth Control
- Advance trocar to posterior 25% of vertebral body depth on lateral view before inserting curved cannula
- Insert curved cannula through trocar; advance to center of the vertebral body (50% depth) on lateral — this is the BVF location
- Correct lateral position: tip slightly posterior to true center (posterior 40–50% of body depth)
- Stop immediately if trocar or cannula approaches the anterior 25% on lateral — risk of anterior cortex breach
- Anterior cortex breach = potential injury to great vessels or viscera — abort and obtain CT
Troubleshooting
Curved cannula will not redirect to midline
Likely cause: Pedicle entry point is too lateral — the curved cannula's trajectory from a lateral starting position cannot reach the midline BVF even with full deflection.
Next step: Remove the cannula. Re-enter the pedicle more medially (aim for the medial third of the pedicle oval on AP view). Re-insert and confirm midline tip position on AP before proceeding to ablation.
Cortical breach detected
Likely cause: Over-advancement of trocar or cannula beyond intended depth; excessive lateral angulation causing pedicle wall breach.
Next step: Obtain CT immediately to characterize the breach location. Minor posterior cortex breach without neural injury may allow cautious continuation. Anterior cortex breach or medial pedicle breach with neurologic concern: abort procedure. Neurologic exam post-procedure mandatory.
Post-procedure worsening pain (acute)
Likely cause: Post-ablation inflammatory response — very common (20–40%). The ablation zone triggers a local inflammatory cascade before healing. This is expected and typically peaks at 1–2 weeks then resolves by 2–4 weeks.
Next step: Counsel patient pre-procedure that this is expected. Manage with NSAIDs (if not contraindicated). If severe or associated with neurologic symptoms, obtain MRI to exclude hematoma or infection. Most cases self-resolve within 4 weeks.
Wrong levels selected / Modic type mismatch
Likely cause: Modic levels confirmed on old imaging not repeated; Modic type misidentified (Type III treated as Type II); confusion between adjacent vertebrae.
Next step: Always re-examine the MRI T1 and T2 sequences immediately before the procedure. Confirm level by counting from S1 on both AP fluoroscopy and the MRI. Type III (hypointense on both T1 and T2) will not respond — do not treat. If any uncertainty about level, obtain intraoperative CT correlation before trocar placement.
Complications
Expected / Common
- Post-procedure pain flare (20–40%) — transient worsening of LBP for 2–4 weeks post-ablation; inflammatory response to ablation zone; counsel patient before discharge; manage with NSAIDs; resolves spontaneously
- Minor access site discomfort — pedicle entry site soreness; expected; resolves in days
Serious / Rare
- Vertebral fracture through ablation zone — very rare; risk increased with osteoporosis; screen with DEXA pre-procedure; T-score < −2.5 is contraindication
- Neurologic injury — rare with proper technique; lateral pedicle breach can cause epidural hematoma or nerve root injury; medial breach can injure thecal sac; confirm AP pedicle position throughout trocar advancement
- Infection (diskitis / vertebral osteomyelitis) — incidence <0.5%; prophylaxis with cefazolin 1g IV + strict sterile technique; presentation: fever, worsening pain, elevated inflammatory markers; workup with MRI spine with contrast; treat with antibiotics ± surgical drainage if abscess
- Incomplete ablation — suboptimal Modic change coverage; may require second-stage procedure; ensure bilateral pedicle access and midline cannula tip confirmation before each ablation
Critical Pearls
References
Citations
- Prologo JD, Ray CE Jr., eds. Advanced Pain Management in Interventional Radiology: A Case-Based Approach. Thieme; 2024. Ch. 30 (Nguyen AML, Nguyen DTD).
- Fischgrund JS, Rhyne A, Franke J, et al. Intraosseous basivertebral nerve ablation for the treatment of chronic low back pain: a prospective randomized double-blind sham-controlled multi-center study. Eur Spine J. 2018;27(5):1146–1156.
- Khalil JG, Smuck M, Koreckij T, et al.; INTRACEPT Trial Investigators. A prospective, randomized, multicenter study of intraosseous basivertebral nerve ablation for the treatment of chronic low back pain. Spine J. 2019;19(10):1620–1632.
- Fischgrund JS, Rhyne A, Franke J, et al. Randomized controlled trial of basivertebral nerve ablation for the treatment of chronic low back pain. Spine J. 2018;18(10):1753–1765.
- Modic MT, Masaryk TJ, Ross JS, Carter JR. Imaging of degenerative disk disease. Radiology. 1988;168(1):177–186.
- Lotz JC, Fields AJ, Liebenberg EC. The role of the vertebral end plate in low back pain. Global Spine J. 2013;3(3):153–164.
References & Resources
Key Guidelines
- SIR Standards of Practice for Thermal Ablation
- ACR Appropriateness Criteria for Low Back Pain
Primary References
- Fischgrund JS et al. Randomized controlled trial comparing radiofrequency ablation of the basivertebral nerve to conservative medical management for treatment of chronic low back pain. Spine J. 2018;18(10):1794-1802.
- Prologo JD, Ray CE Jr., eds. Advanced Pain Management in Interventional Radiology. Thieme; 2024. Ch. 30: Basivertebral Nerve Ablation.
- Becker S et al. Basi-Vertebral nerve ablation in chronic vertebrogenic low back pain. Acta Neurochir Suppl. 2019;125:179-183.